The yellow kit, box by box: how to fill in Modulo 1
Section by section, with the real names printed on the form. The order you fill it in, what you skip, where the permit code goes, and why the signature comes last.
Redazione Bahay 14 min read

In this article
- Before you write: what goes on the table
- The three writing rules
- The right order, which is not top to bottom
- The heading, at the top of page one
- Section 1 — Details of the application
- Section 3 — Personal details
- Section 4 — Identity document
- Section 5 — Visa. First application only
- Section 6 — Travel document. Only if it applies to you
- Section 7 — Your address in Italy
- Section 8 — Address for communications
- Section 9 — Long-term residence card only
- Sections 10, 11 and 12 — Family
- Section 2 — Now, and not before
- Modulo 2: does it apply to you?
- Before you close the envelope
- At the counter
- One thing to know about this guide
This is the guide to keep open next to the form while you fill it in. It does not explain what the kit is or what it costs: that is in the two guides linked below. Here we go section by section, with the real names printed on the paper.
The big form is called Modello 209 — Modulo 1. It is eight pages long, but most of the sections do not concern you: you skip them. In an ordinary renewal, five or six sections are actually filled in.
Before you write: what goes on the table
- The residence permit you hold, even if it has expired.
- Your passport.
- Your codice fiscale (Italian tax code), if you have one.
- A black pen. Not blue, not a faded ballpoint: black.
- The instructions inside the kit, with the code tables.
You are given one kit per person. It is not filled in standing at the counter: you take it home and write calmly.
The three writing rules
- Block capitals, black pen. It is printed on the form itself, at the top of every page.
- One letter per box, and one empty box between words. The form is read by a machine before it is read by a person.
- No crossing out and no correction fluid. A box corrected twice is a box someone will have to interpret.
The right order, which is not top to bottom
This is the thing the form does not say out loud and the instructions do: section 2 is filled in last, when everything else is done and the photocopies are ready. In that section you have to write how many sheets there are in total, and you cannot know that before.
So the order is: the heading, then section 1, then from section 3 onwards, and at the end you go back to section 2.
The heading, at the top of page one
It reads Al Signor Questore di: with a box for the province code. It is the province where you live, not where you were born or where you work. The code is in the table inside the instructions: MI for Milan, RM for Rome, NA for Naples.
In the corner there is the space for the 16 euro revenue stamp (marca da bollo), which you buy at a tobacconist and stick there.
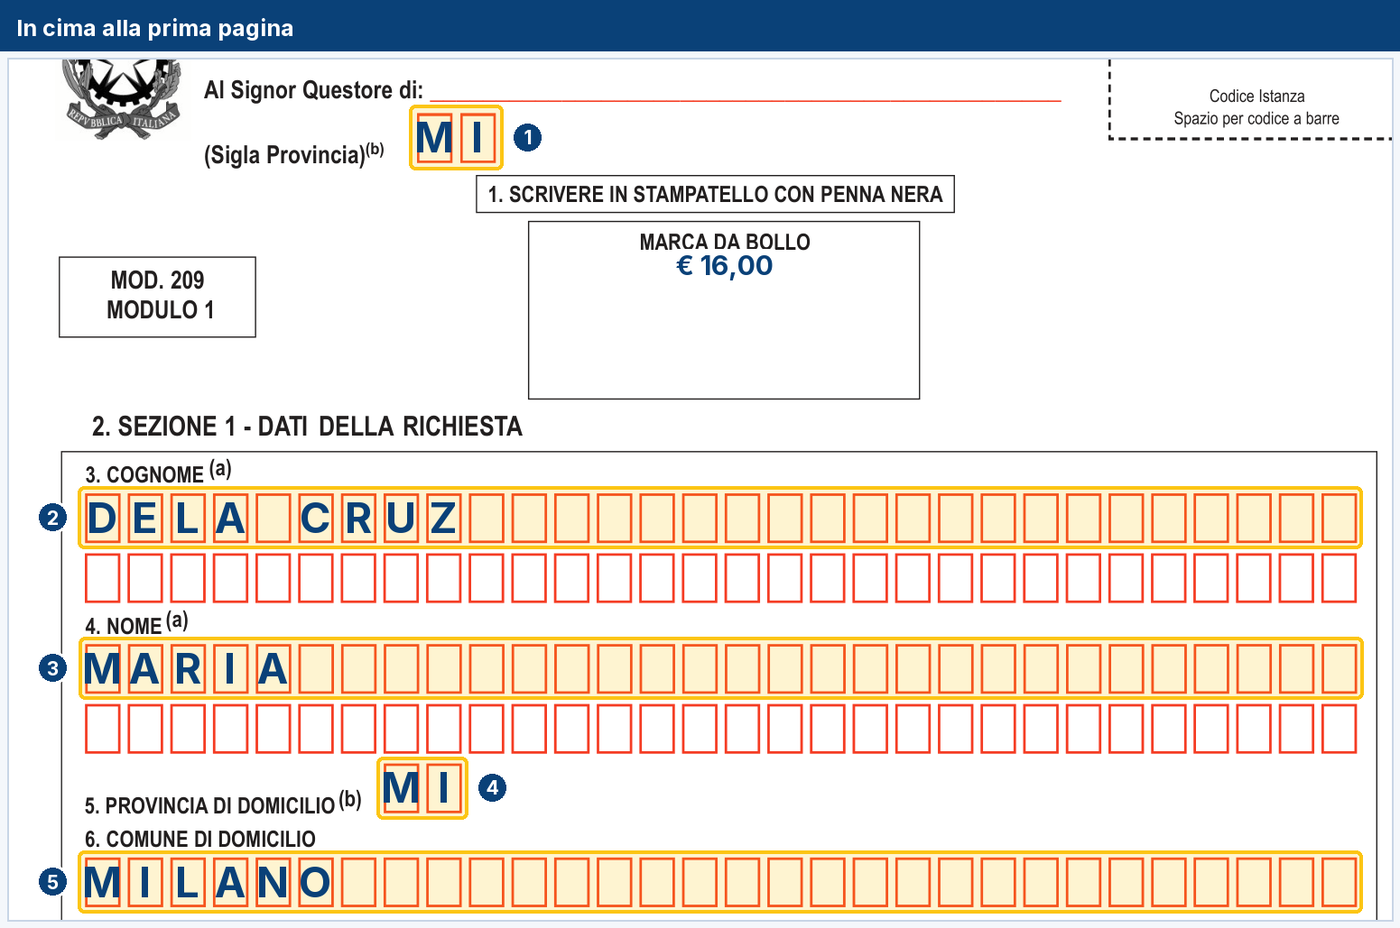
- The province code where you live — MI for Milan here.
- The surname, one letter per box. If it is two words, you leave one empty box in between.
- The first name, the same way.
- The province of residence, the code again.
- The town where you live, written out.
Section 1 — Details of the application
This is the part that decides everything else.
- Surname and first name: copied from the passport, letter by letter. Even if people in Italy call you something else, even if the order looks wrong to you. The form is not the place to correct a name.
- Province and municipality where you live.
- What you are applying for: there is a box for each of these five words — issue, renewal, update, duplicate, conversion. You tick one only, with an X.
- Of what: residence permit or long-term residence card.
- Type code of the permit you are applying for: it is not written in words, you write the code from the table of reasons inside the instructions.
- The number of the permit you hold, its type code and its expiry date.
If you are renewing, the reason must be the same one written on the permit you hold. If yours says employed work, that is what goes here, even if you have changed employer in the meantime. Changing the reason is not a renewal: it is a conversion, and it is a different application. If you are not sure which of the two you need, ask before filling in the form.
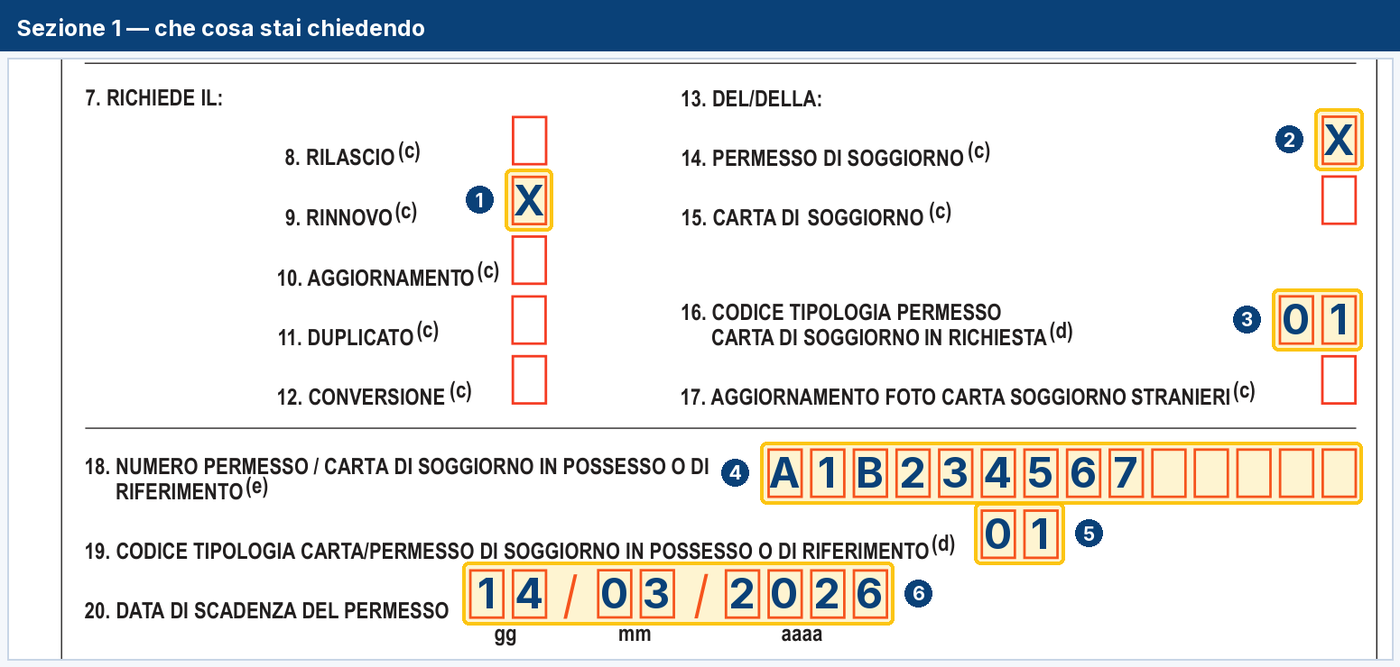
- Renewal: one X only among issue, renewal, update, duplicate and conversion.
- Of what: residence permit or long-term residence card.
- The code of the permit you are applying for, from the table in the instructions.
- The number of the permit you hold.
- The code of that permit.
- Its expiry date, day month year.
If you have a middle name
This concerns nearly every Filipino citizen, and it is where mistakes happen. On the passport the middle name — your mother's maiden surname — has a field of its own, separate from the first name and the surname. On the residence permit it is sometimes there and sometimes not, depending on how it was registered years ago.
The practical rule for this form: look at the permit you are renewing and write the name the way it appears there. If the middle name is on the permit, put it here too; if it is not, do not add it now. The reason is that the new permit and the old one must say the same thing: two permits with two different names are, to an office, two different people — and the tax code is tied to only one of them.
If the permit and the passport do not match, do not try to fix it inside this form: it is a separate procedure, explained in full in the guide to the Filipino middle name in Italian documents — including the two papers to ask for at the town hall, the ones proving that the old and the new details belong to the same person.
Section 3 — Personal details
Tax code if you have one, marital status, sex, date of birth, city of birth, and two codes copied from the tables: the code of your country of birth and the code of your country of citizenship. For the Philippines it is PHL; the others are in the country code table attached to the instructions.
Marital status is not written in words: you put a letter. A if you are single, B if you are married. Sex is M or F.
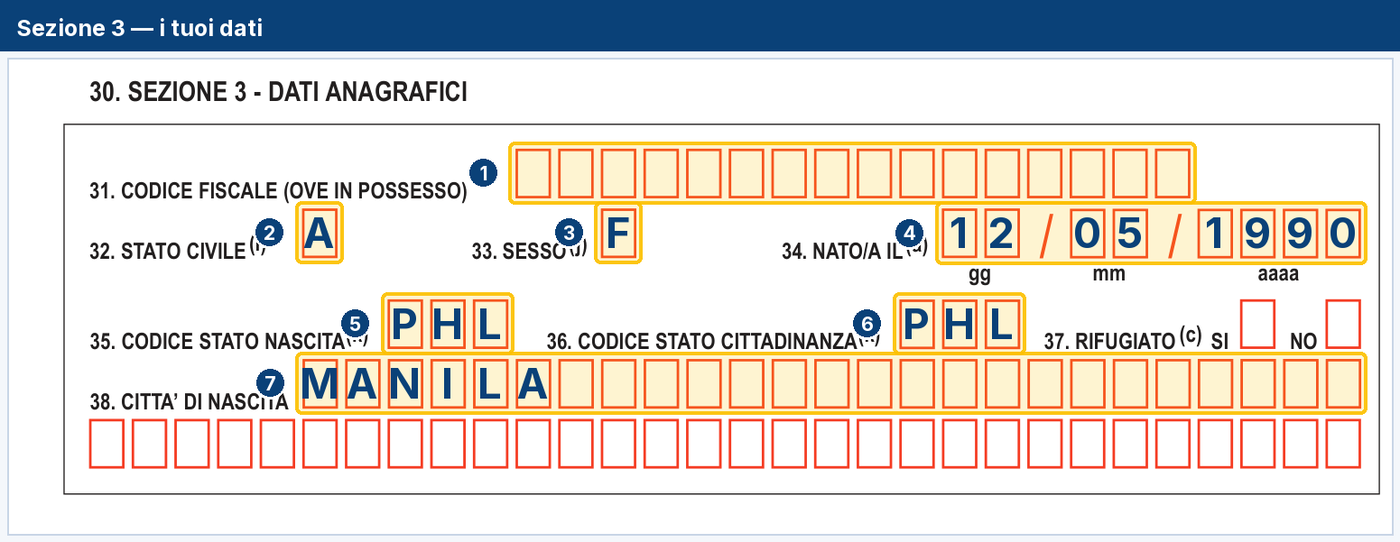
- The codice fiscale, if you have one. If you do not, leave it empty.
- Marital status: A if single, B if married.
- Sex: M or F.
- The date of birth.
- The country of birth code — PHL for the Philippines.
- The country of citizenship code.
- The city of birth, written out.
Section 4 — Identity document
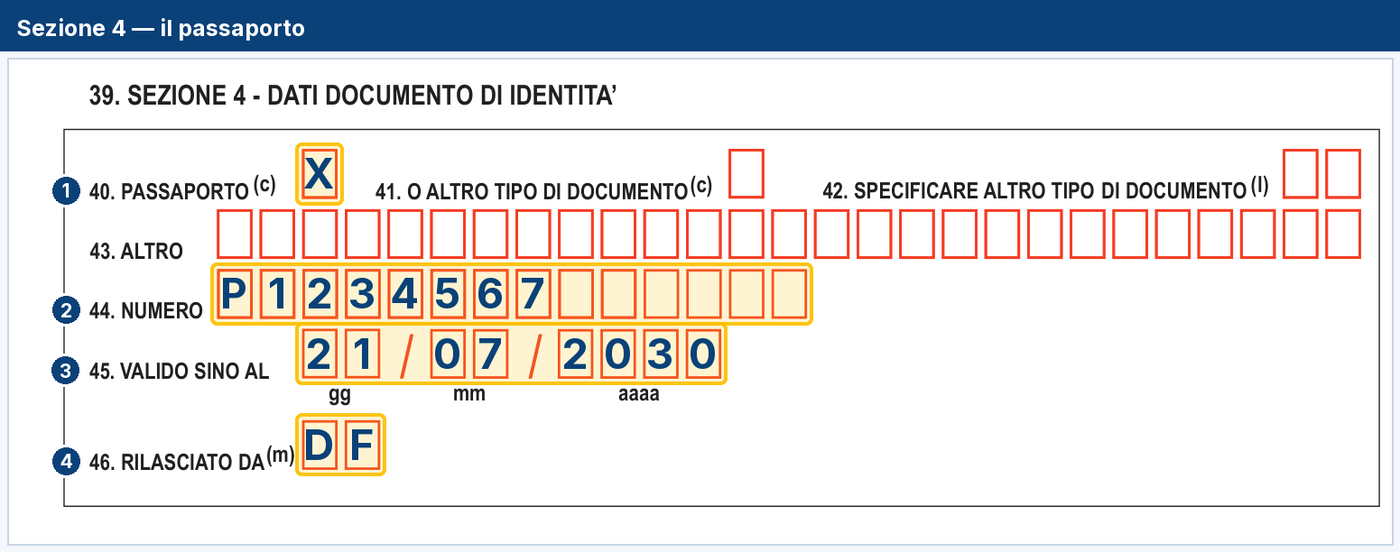
- The passport box, ticked with an X.
- The passport number.
- How long it is valid.
- Who issued it.
Passport number, validity date, issuing authority. If instead of a passport you hold an equivalent document, you tick the other box and write which one, with the code from the table of equivalent documents.
Section 5 — Visa. First application only
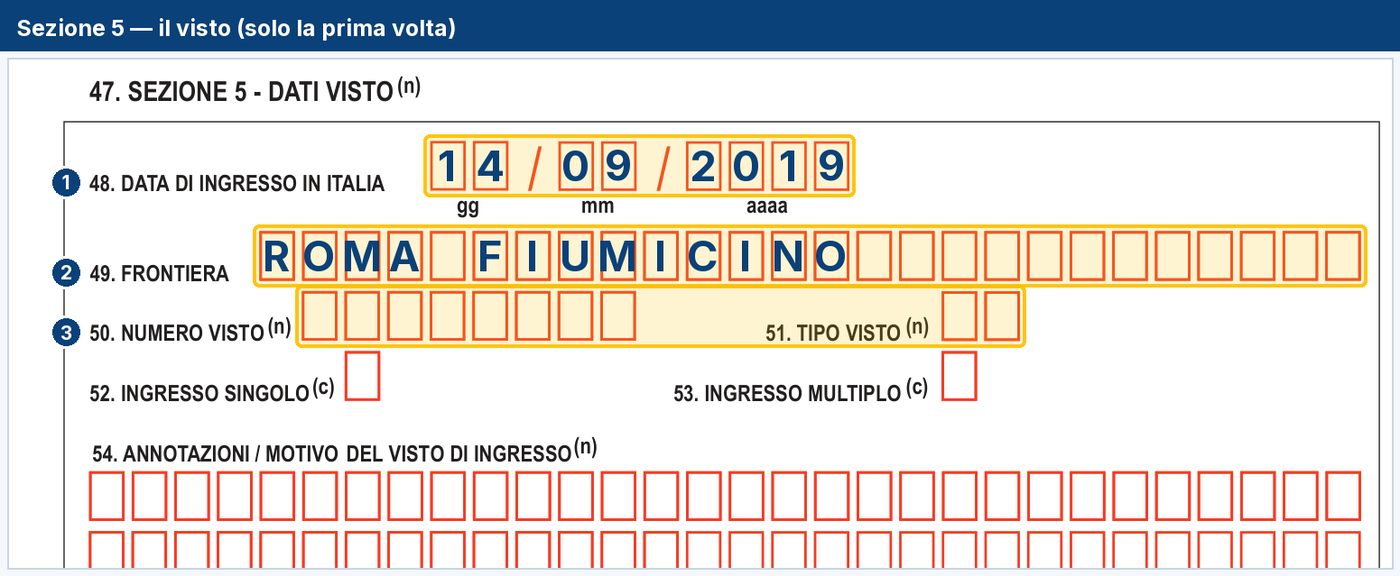
- The date of entry into Italy.
- The border you came through.
- The visa number, copied from the visa itself.
Date of entry into Italy, border crossing, visa number and type. You fill this in only if this is your first application for a permit or a residence card. In a renewal you skip it.
Section 6 — Travel document. Only if it applies to you
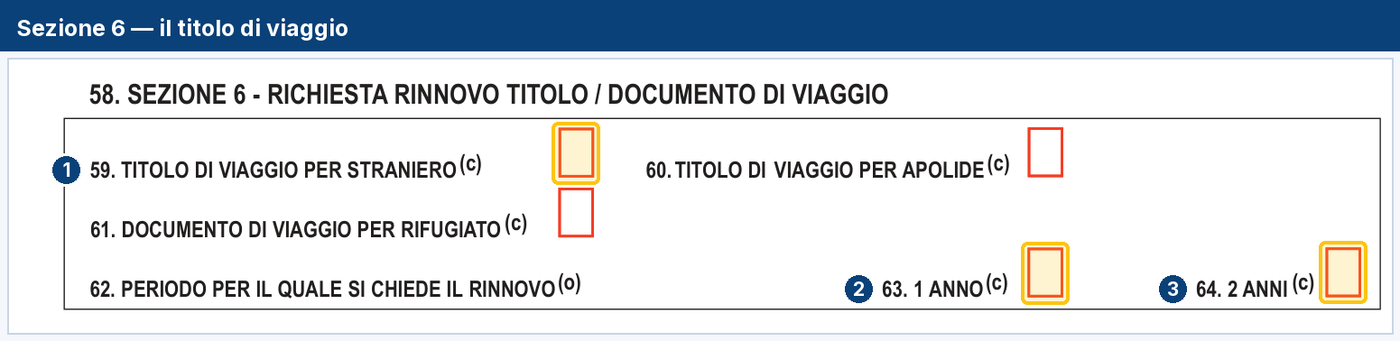
- Which document you are renewing.
- For how long: 1 year…
- …or 2 years, but never longer than the permit.
This is for people who are also renewing a travel document for foreigners, for stateless persons or for refugees. If that is not your case, skip it. Note one rule written in the instructions: the renewed travel document cannot last longer than the residence permit.
Section 7 — Your address in Italy
Province, municipality, street, house number, staircase, flat number, postcode. Then email and telephone, marked as optional.
Optional on the form, crucial in real life: this is the address the questura writes to — the summons, a rescheduled appointment, a request for a missing document — and today many messages travel by SMS. It must be the address where post actually reaches you and where your name is on the doorbell or the letterbox. And if you move house while the application is in progress, moving is not enough: updating the permit is a separate application.
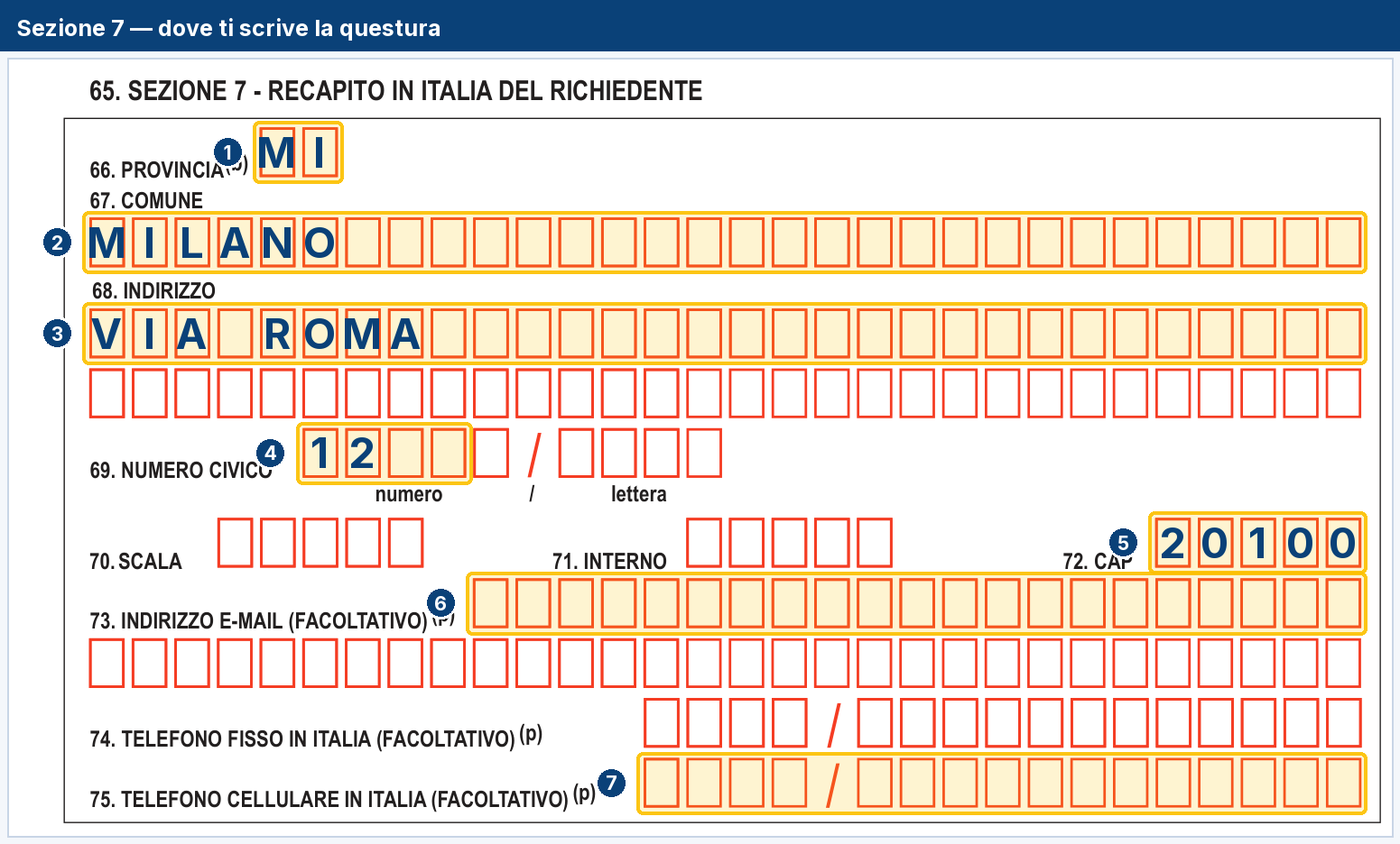
- The province.
- The town.
- The street: between VIA and the street name you leave one empty box.
- The house number.
- The postcode.
- The email: optional on the form, in real life the fastest way the questura has to reach you.
- The mobile number: summons often travel by SMS these days.
Section 8 — Address for communications
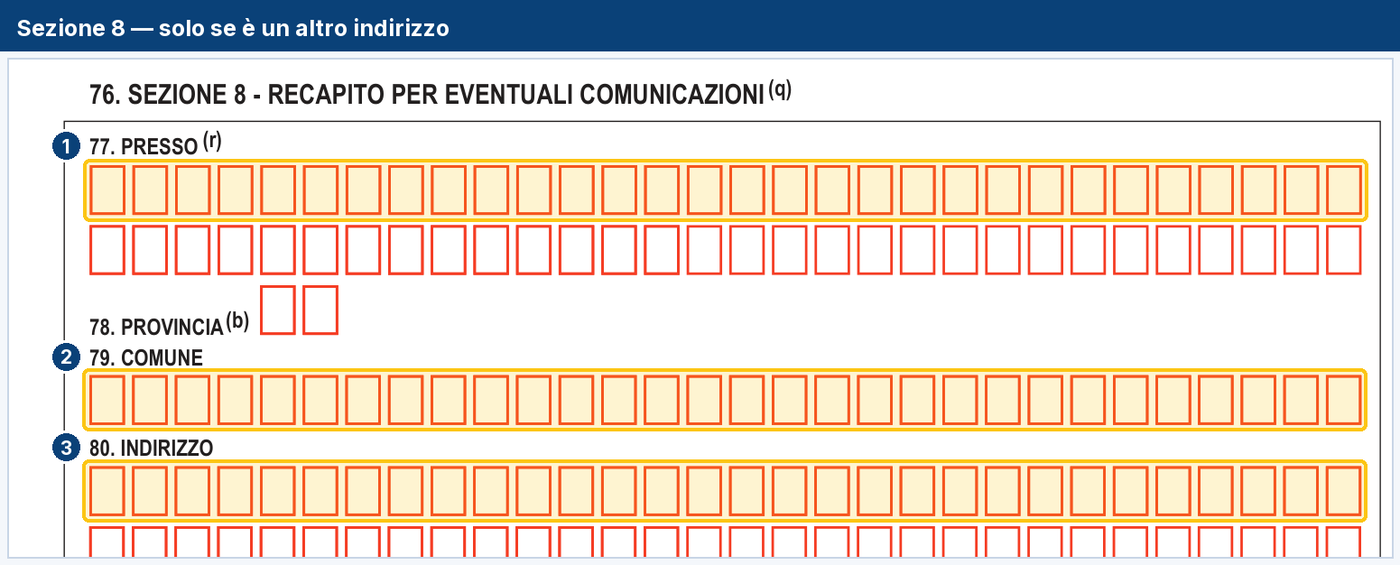
- c/o: the name of whoever receives post for you.
- The town…
- …and the street.
Fill this in only if it is different from the previous one. The instructions say it in one line: if the same as above, do not fill in. There is a c/o box where you write the name of a person or an association, if you would rather the questura letter arrived there.
Section 9 — Long-term residence card only
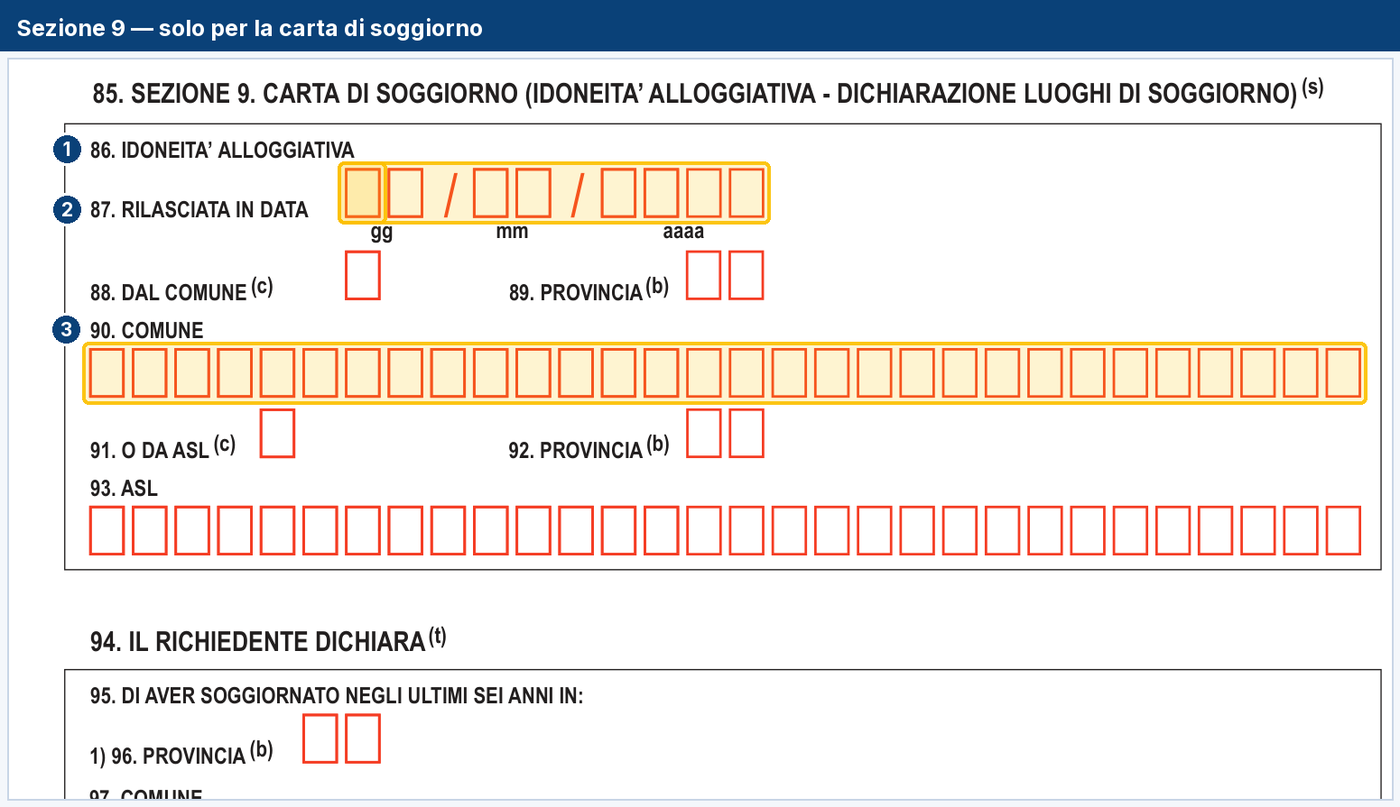
- The housing suitability certificate, if you have one.
- The date it was issued.
- The town that issued it.
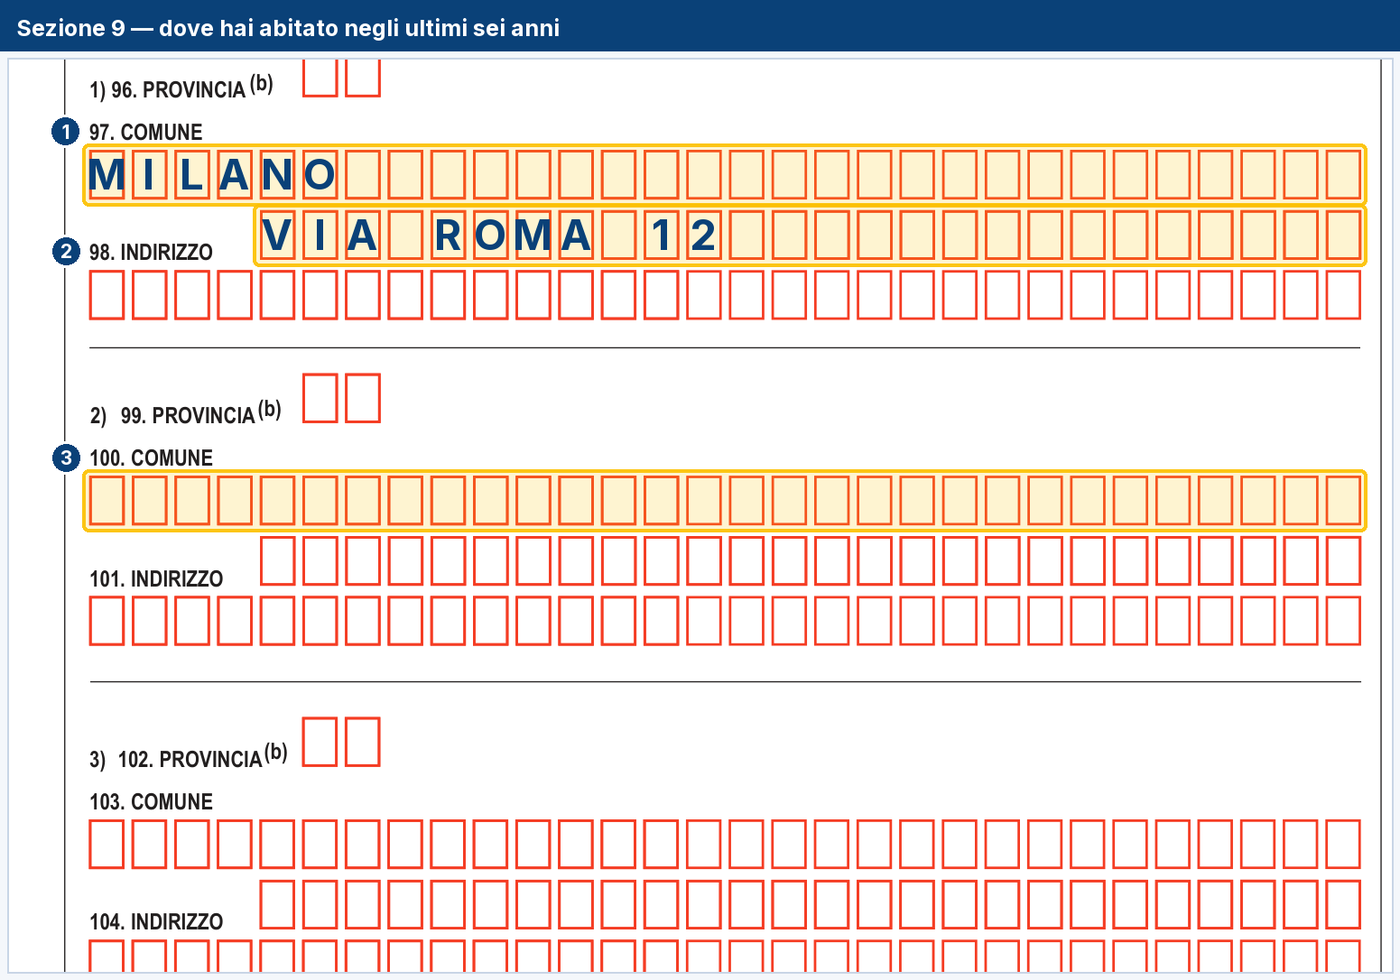
- The town where you lived…
- …and the street.
- Then the place before, and the one before that: six years in all.
Housing suitability certificate, and the list of places where you have lived over the last six years. This concerns people applying for the EU long-term residence permit. If you are renewing an ordinary permit, skip the whole section.
Just below there is a box asking whether this application is connected to one filed by your spouse or a parent. Fill it in only if your spouse or parent are filing their application together with yours.
Sections 10, 11 and 12 — Family
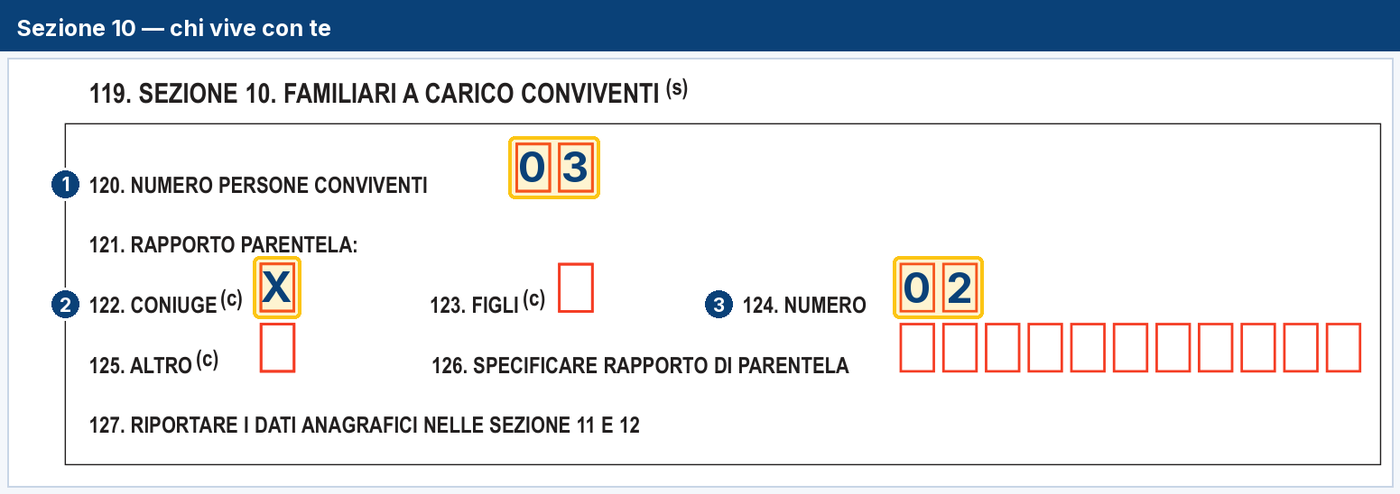
- How many people live with you as dependants.
- Whether one of them is your spouse.
- How many children.
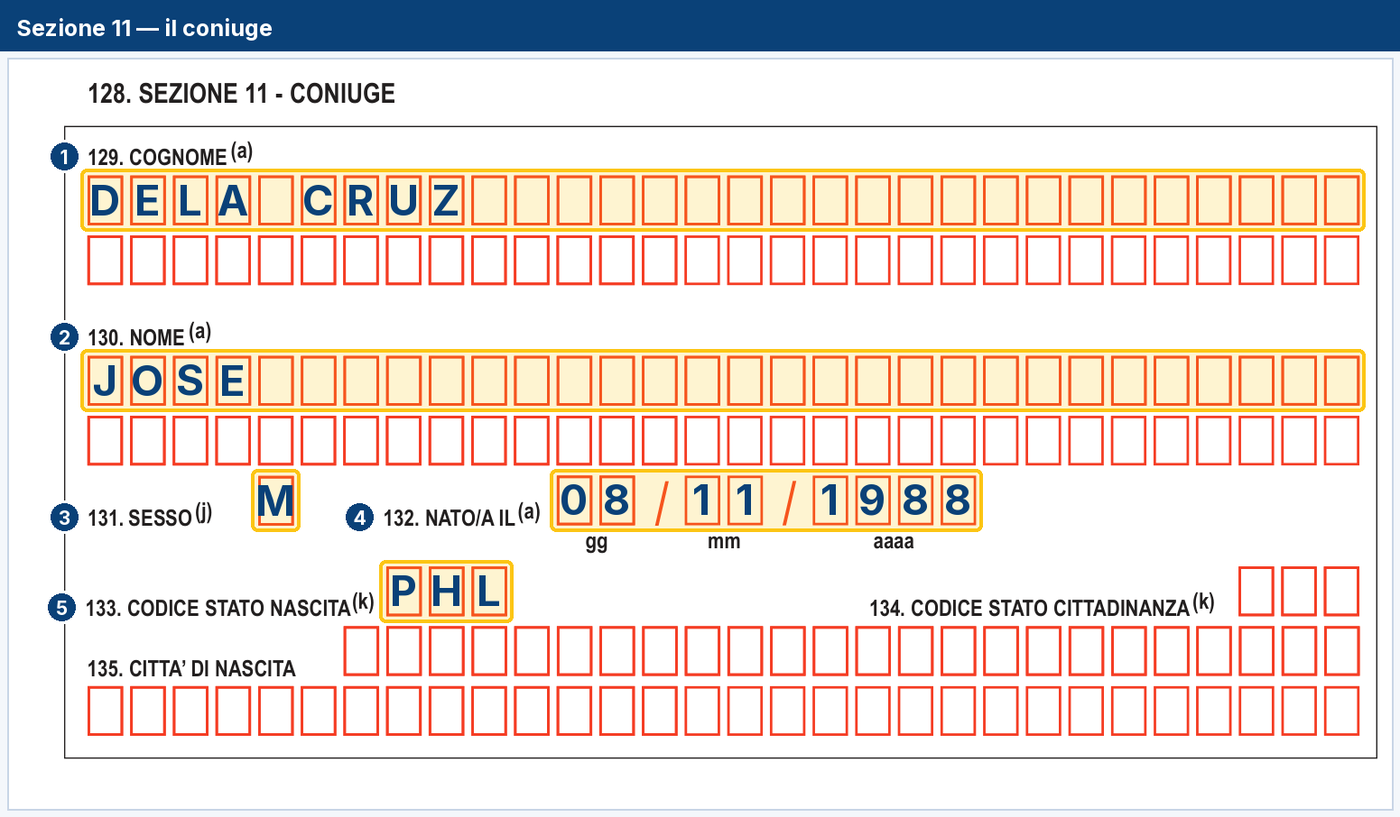
- Your spouse’s surname.
- First name.
- Sex.
- Date of birth.
- The country of birth code.
The instructions are precise: these sections are filled in when applying for a residence card or converting a permit from other reasons to family reasons. If that is your case:
- Section 10: how many dependent relatives live with you and what their relationship to you is — spouse, children, other.
- Section 11: your spouse’s details.
- Section 12: dependent children under 14 lawfully staying in Italy, one per box. Adopted or fostered children and children under guardianship count as children.
If you have minor children registered on your permit, they must come with you to the questura appointment, and each child under fourteen needs passport photos. Bring four each, white background, at least 45 mm high and 35 mm wide: the Ministry of the Interior’s portal asks for four, a State Police sheet asks for two, and four works in both cases. It is the omission that costs a second appointment.
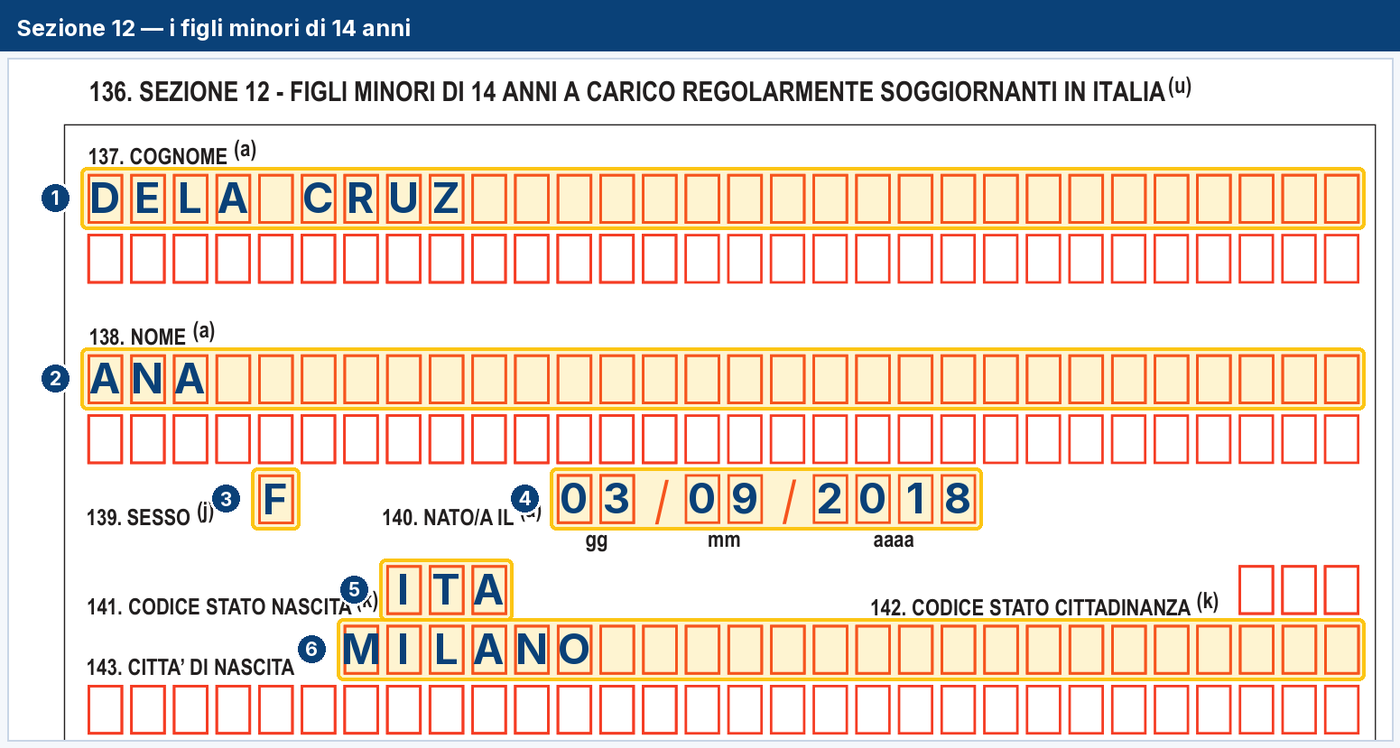
- The child’s surname.
- Their first name.
- Their sex.
- Their date of birth.
- The country of birth code — ITA if born in Italy.
- The city of birth.
Section 2 — Now, and not before
You come back to it at the end, when everything else is written and the photocopies are made.
- Which forms you filled in: Modulo 1 alone, or Modulo 1 and Modulo 2.
- The total number of sheets your application is made of: the forms plus every photocopy. You count them one by one.
- The number of dependent children you declared in section 12.
- Date and signature.
Above the signature is the line saying that anyone making false statements is punished by law. It is not a formality: it is the reason you only write what you can prove.
If the signature is missing, the post office does not accept the application. It is written in the kit instructions, in those words.
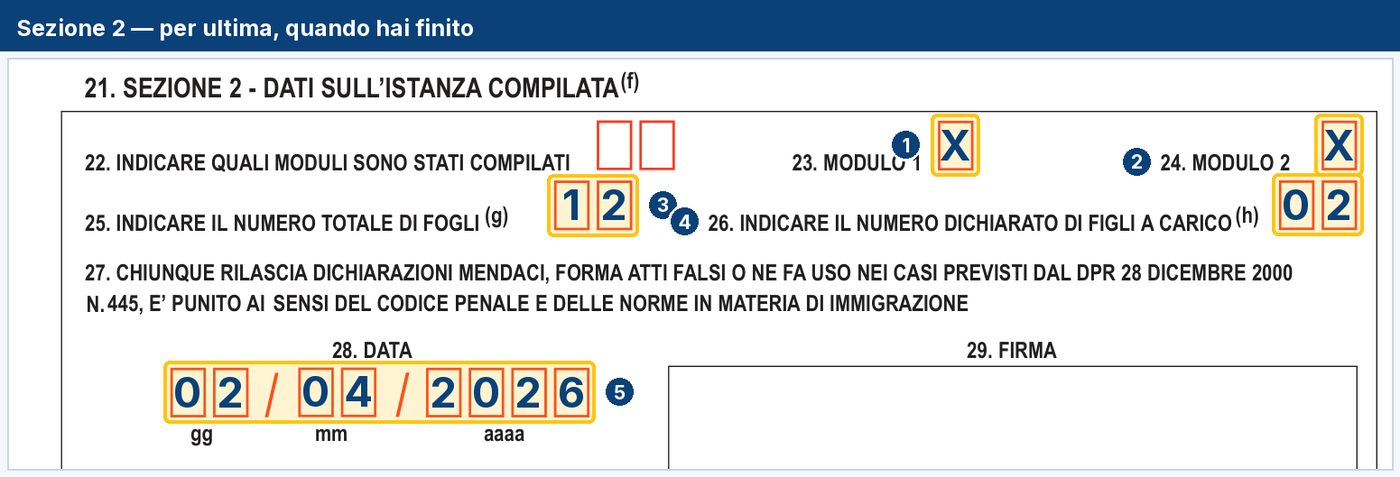
- Modulo 1: always ticked.
- Modulo 2: ticked only if you filled it in.
- The total number of sheets, forms and photocopies together. You really count them.
- The number of children you declared in section 12.
- The date, and below it the signature: without a signature the post office does not accept the application.
Modulo 2: does it apply to you?
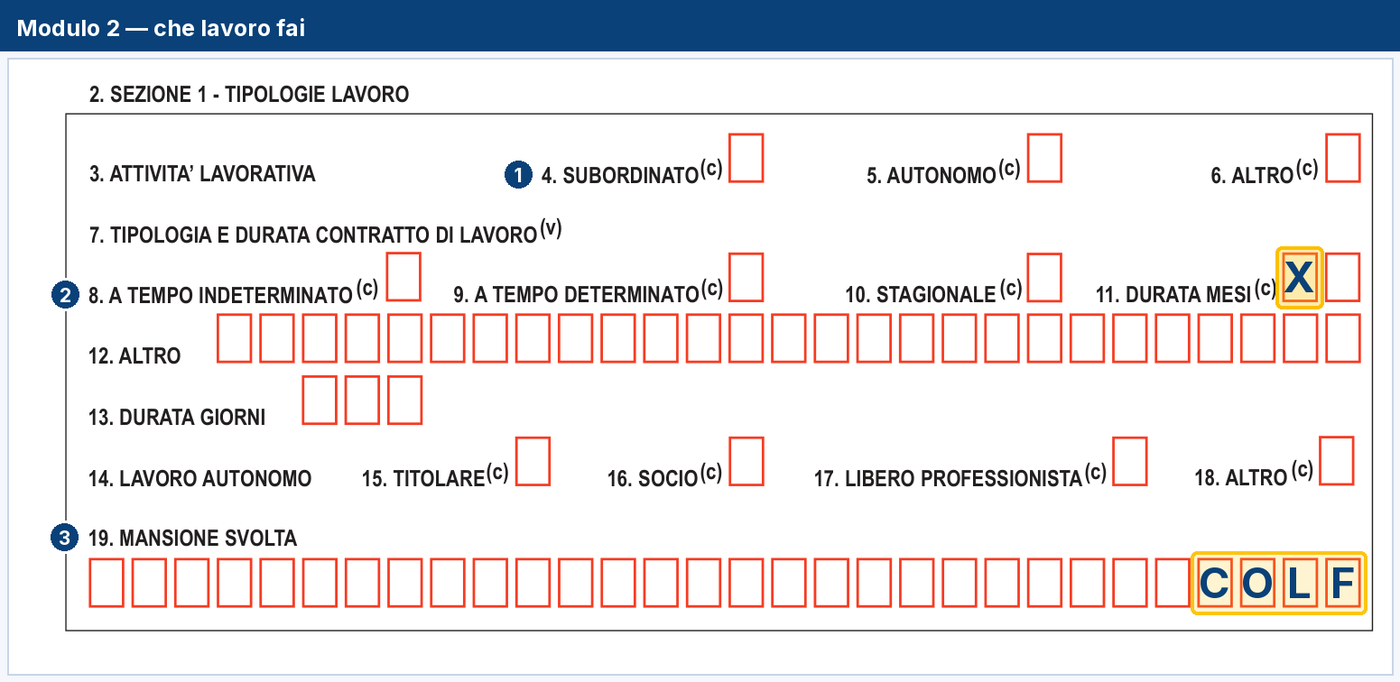
- What work you do: employed if you are on a contract.
- The contract: open-ended, fixed-term or seasonal.
- The job — COLF, for example.
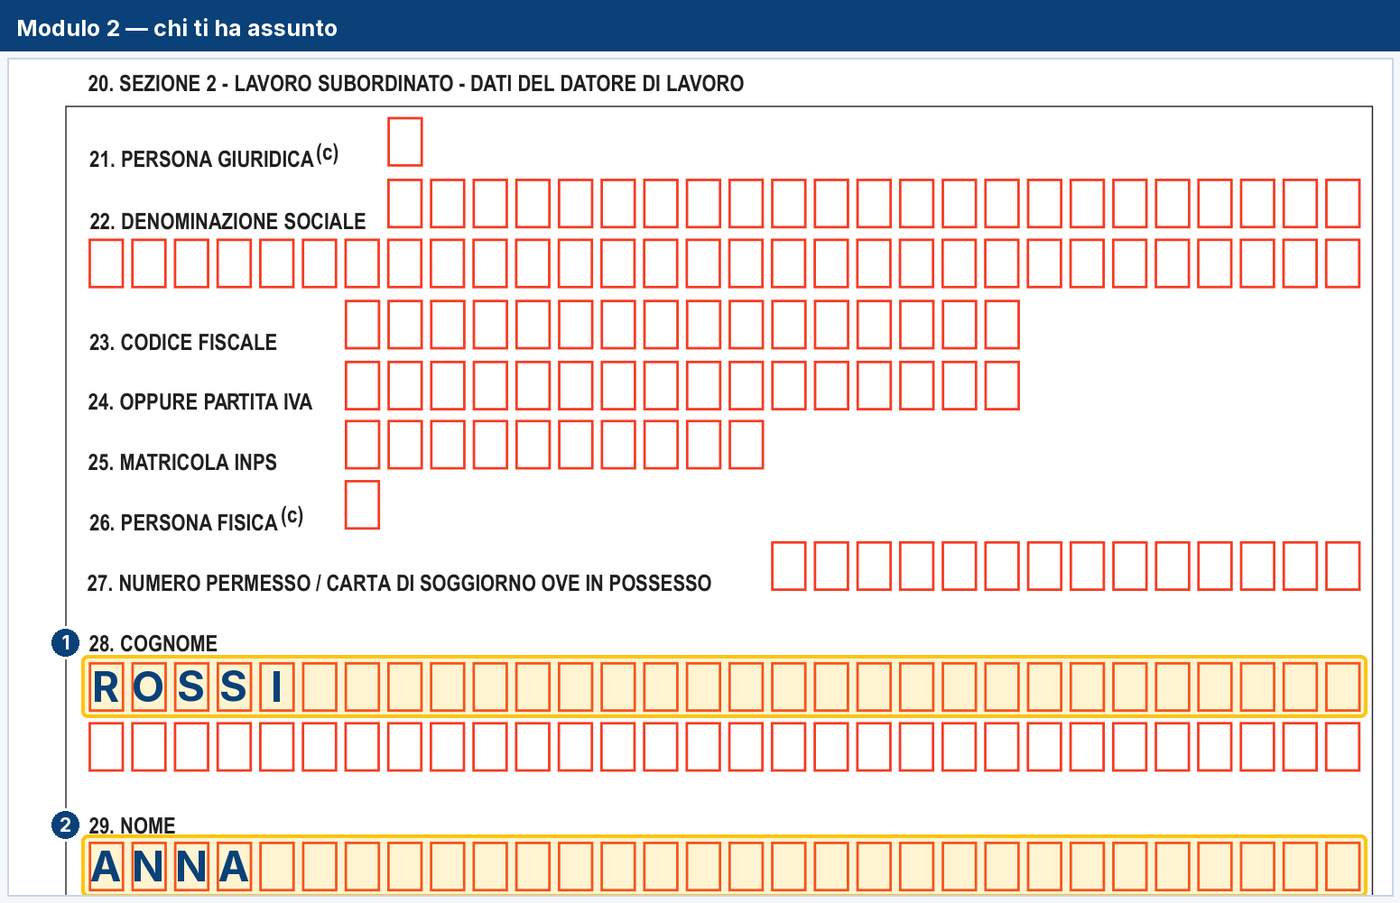
- If the person hiring you is an individual and not a company — the case for anyone working in a household — you fill in this part: surname…
- …and first name.
- Then their tax code.
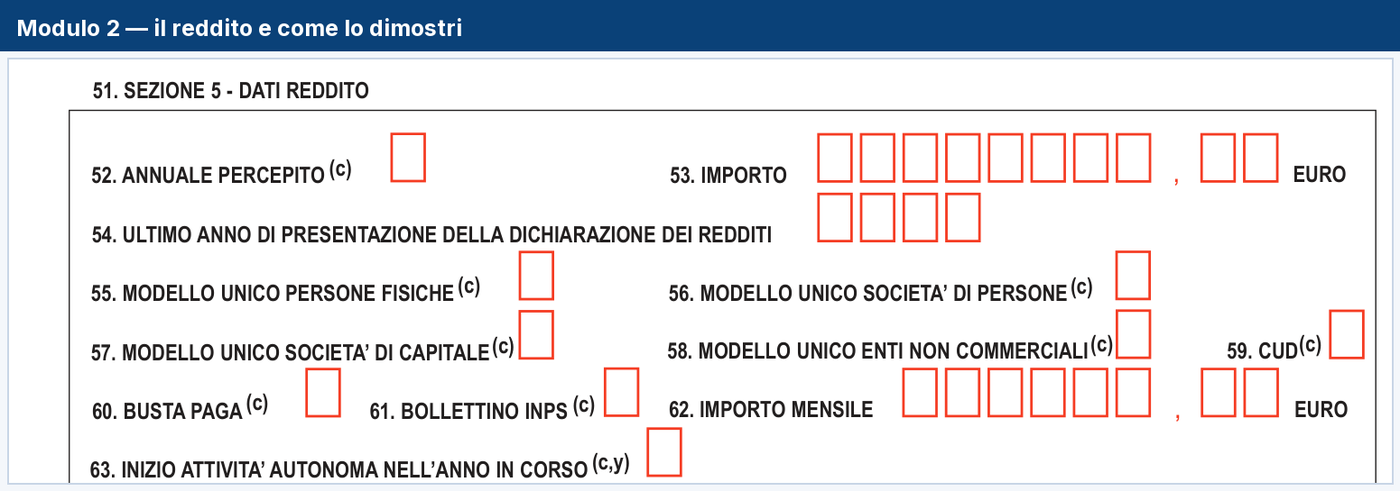
- How much you earned during the year.
- Which document proves it: payslip, Certificazione Unica, tax return.
Modulo 2 is filled in if you have income from work. The kit instructions say to fill it in before closing section 2 of Modulo 1, because in that section you declare which forms you filled in.
It is much shorter, and here too you skip most of it:
- Section 1 — Type of work: employed, self-employed or other; whether the contract is open-ended, fixed-term or seasonal, with its length; the job you do.
- Section 2 — Employer details: if it is a company, name, tax code or VAT number, INPS (National Social Security Institute) registration number; if it is a person — which is the case for anyone working in a household — surname, first name, date of birth and tax code.
- Section 3 — Residence contract: for those who signed the contratto di soggiorno at the prefecture’s immigration desk.
- Section 4 — Self-employment: only for people working on their own account.
- Section 5 — Income: how much you earned, and which document proves it — payslip, Certificazione Unica, tax return, INPS payment slip.
- Section 6 — Employment centre: date and place of registration, if you are registered.
One rule from the instructions is worth knowing: anyone hired during the current year attaches copies of their latest payslips, because last year’s tax return would say nothing about that job.
If Modulo 2 does not apply to you, leave it blank and put it in the envelope anyway.
Before you close the envelope
Photocopies must be A4 size: the instructions say so. Only photocopies go in the envelope — never originals, never passport photos, which you bring to the questura appointment.
What everyone needs: a photocopy of the passport, the expiring or expired permit front and back, the receipt of the paid slip, and the documents for the reason of your permit. The precise list is published by the questura of your province: that is the list to follow.
One piece of advice that costs nothing: photograph everything in the envelope before you hand it in, forms included. If in six months someone asks what you declared, you have the answer.
At the counter
The envelope is taken open to an authorised post office, at the Sportello Amico counter. The clerk checks it, charges the service fee and gives you the receipt with the assicurata code and the hologram code: those are the two codes you then use to follow your application on the Immigration Portal.
That receipt is not a till slip: it is the document proving the application was filed. Keep it, and do not lose it.
One thing to know about this guide
The section names are those of Modello 209 published by the Ministry of the Interior. The numbering of individual boxes can change from one printing of the kit to another, and some sections cover cases not dealt with here. The instructions inside the kit always have the last word: they are the only sheet that says, for your precise case, what to skip. Do not throw them away with the envelope.
If your case is out of the ordinary — a conversion, a permit that expired long ago, an application refused in the past — a patronato will go through the form with you in half an hour, free of charge. A form filled in wrongly is not corrected: you start again, with a kit they have to give you and a payment slip to redo.